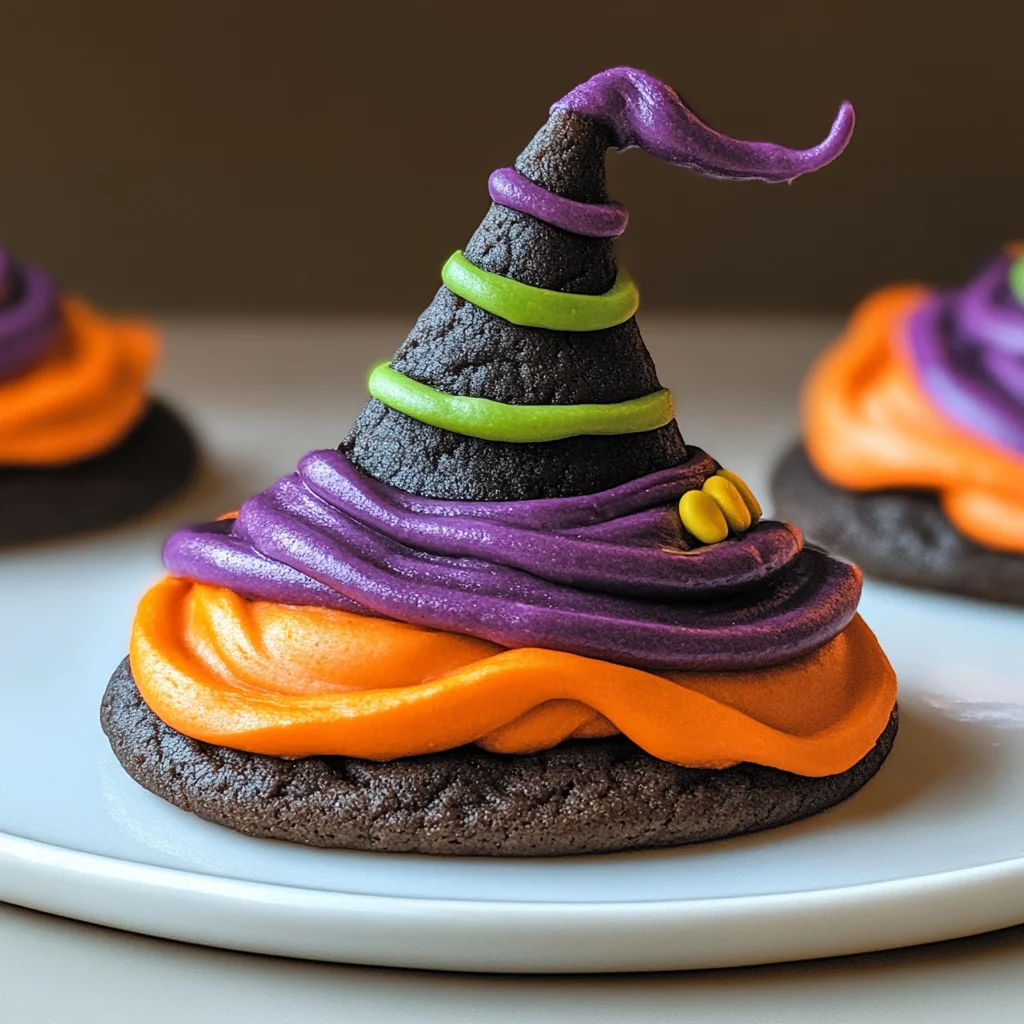
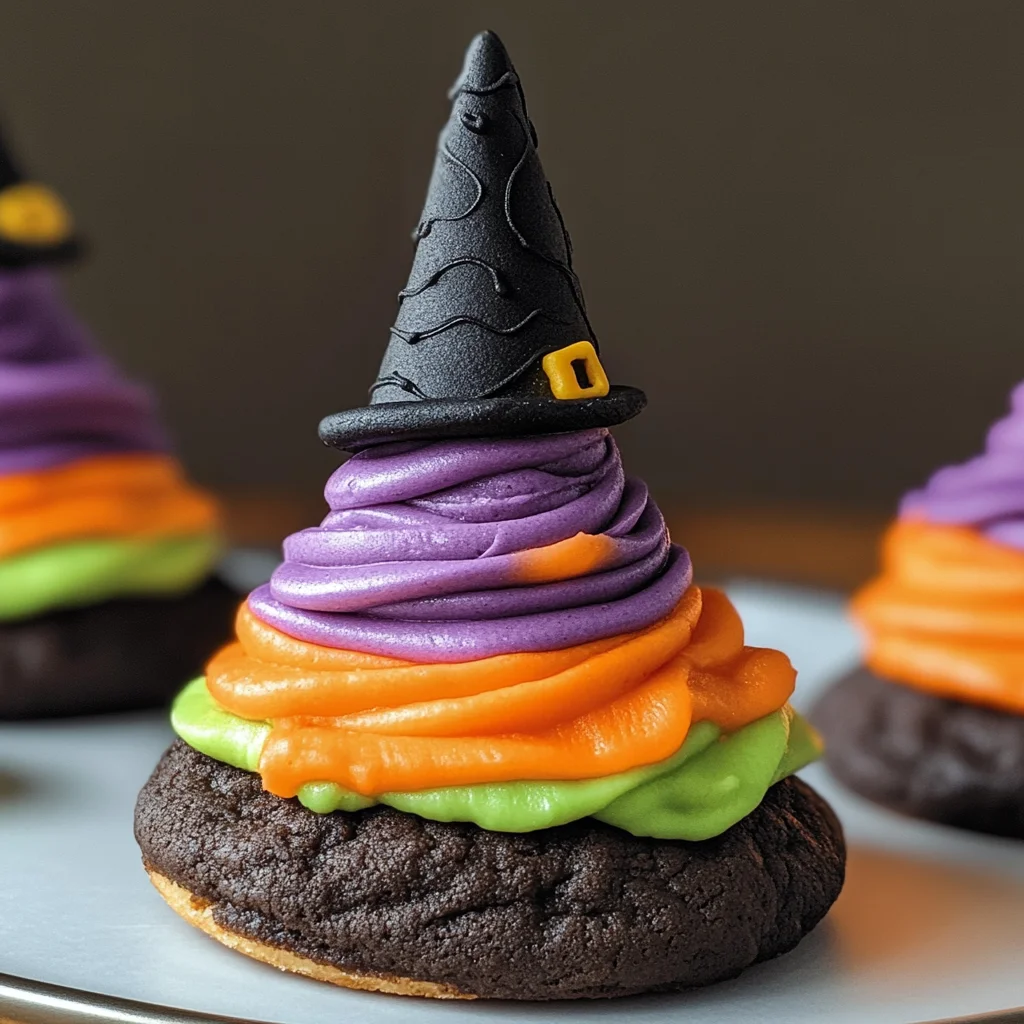
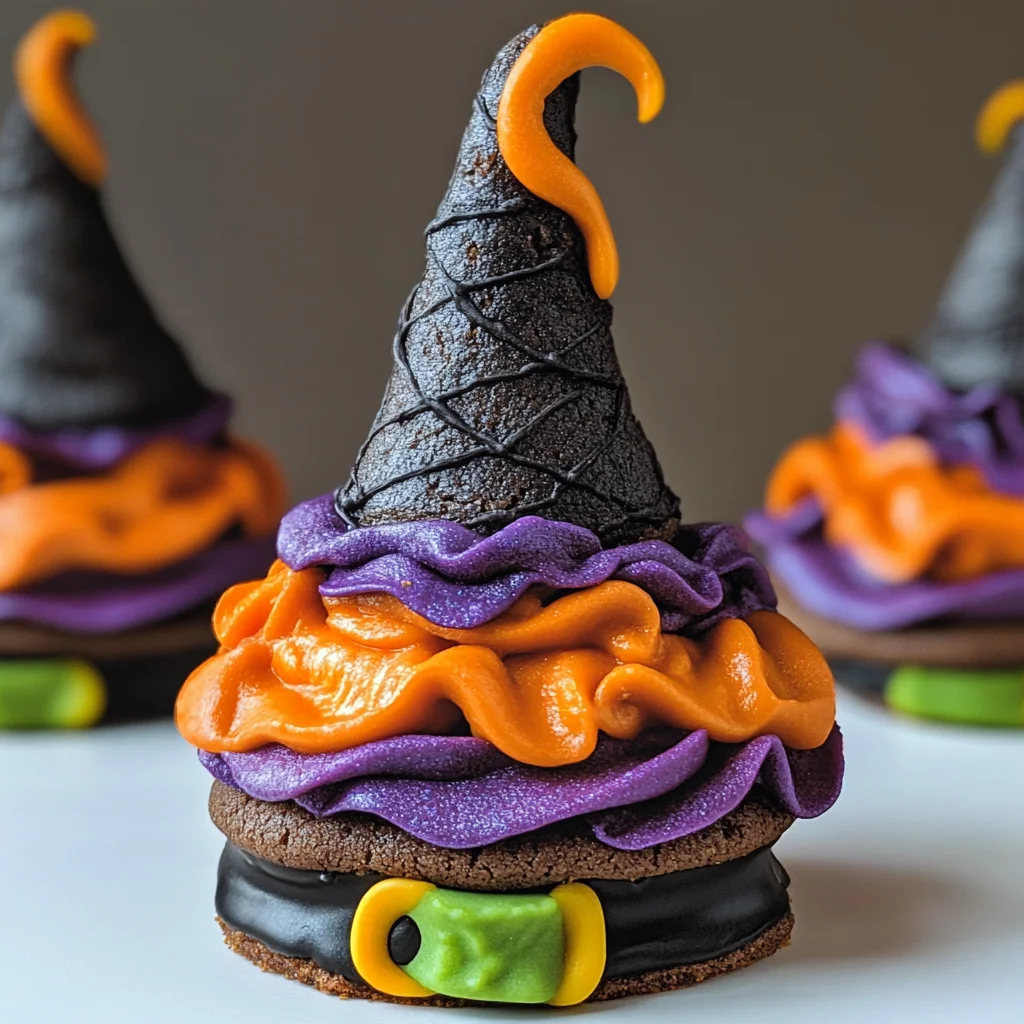
These Halloween Witch Hat Cookies are the perfect treat to impress your Halloween party guests. This fun and chocolaty project is a delightful way to bring kids into the kitchen and get creative. With their whimsical appearance, these cookies are great for various occasions, from spooky gatherings to festive celebrations. Prepare to enchant ghouls and goblins alike with these easy-to-make, customizable treats!
Why You’ll Love This Recipe
- Easy to Make: With simple steps and readily available ingredients, anyone can create these delicious cookies in no time.
- Fun for Kids: This recipe is perfect for involving children in the kitchen, making it a great family activity.
- Customizable Designs: Use different colors and decorations to personalize each cookie, adding a special touch to your Halloween festivities.
- Great for Parties: These witch hat cookies are sure to be a hit at any Halloween gathering or celebration.
- Deliciously Chocolatey: Combining chocolate cookies with cake adds rich flavors that everyone will love.
Tools and Preparation
Before you start baking your Halloween Witch Hat Cookies, gather your tools and prepare your workspace for a seamless baking experience.
Essential Tools and Equipment
- Cupcake Cones Baking Rack
- Cookie Sheet
- Parchment Paper
- Decorating Bags
- Icing Tips (2B and 3)
Importance of Each Tool
- Cupcake Cones Baking Rack: This tool supports sugar cones while they bake, ensuring they maintain their shape.
- Decorating Bags: These allow for precise icing applications, helping create beautiful designs on your witch hats.
Ingredients
To make these delightful Halloween Witch Hat Cookies, you will need the following ingredients:
For the Cake Cones:
- Favorite Cake Mix or Try Wilton’s Chocolate Cake Recipe
- Sugar Cones
For the Cookies:
- Store Bought Chocolate Cookies or Try This Recipe from Wilton
For the Icing:
- Creamy White Decorator Icing, 4 lb. Tub
- Lemon Yellow Icing Color
- Black Color Mist Food Coloring Spray
- Rose Icing Colors Pink Food Coloring
- Violet Icing Color, Gel Food Coloring
- Golden Yellow Icing Color
- Orange Icing Color
How to Make Halloween Witch Hat Cookies
Step 1: Prepare & Bake the Cones
- Prepare the cake mix following the chosen recipe’s instructions.
- Place the Cupcake Cones Baking Rack on a cookie sheet.
- Insert the sugar cones into the rack.
- Fill each cone with 2 tablespoons of cake batter.
- Bake according to the timing instructions of your chosen recipe and let them cool.
Step 2: Spray the Cones
- If needed, trim any risen cake at the top of each cone using a knife.
- Place cones wide side down on parchment paper.
- Using Black Color Mist, spray the cones black and let them dry for about 10 to 15 minutes.
Step 3: Tint the Icing & Prepare the Bags
- Tint 1 cup of creamy white decorator icing orange.
- Tint another cup purple by mixing violet and rose icing colors.
- Prepare two decorating bags with tip 2B, filling them with orange and purple tinted icing respectively.
- Tint ¼ cup of creamy white decorator icing yellow using golden yellow and lemon yellow icing colors; place this in a bag with tip 3 attached.
Step 4: Assemble the Witch Hats
- Pipe a small amount of orange icing in the center of a chocolate cookie; place a cone on top.
- With tip facing outwards, pipe a band around half of the wide ends of cones using orange icing; smooth it with a spatula.
- Repeat this process with purple icing on the remaining cookies and cones.
- Let them set for about 15 to 20 minutes before piping yellow icing around each hat’s band for added detail.
- Allow another set time of 15 to 20 minutes before serving these enchanting treats!
How to Serve Halloween Witch Hat Cookies
These Halloween Witch Hat Cookies are a delightful treat that can be enjoyed in many fun ways. Whether for a spooky party or a family gathering, here are some creative serving suggestions to impress your guests.
Creative Platter Ideas
- Witch’s Cauldron: Arrange the cookies in a large black bowl or cauldron for an enchanting display.
- Spooky Tower: Stack the cookies high on a tiered cake stand for an eye-catching centerpiece.
Themed Drink Pairings
- Pumpkin Spice Latte: The warm flavors of pumpkin spice complement the chocolate cookies perfectly.
- Apple Cider: A refreshing glass of apple cider pairs well with the sweetness of the cookies.
Fun Party Favors
- Cookie Bags: Place individual cookies in clear bags tied with orange ribbon as party favors.
- DIY Decorating Kits: Assemble small kits with icing and decorations for kids to create their own witch hats at home.
Interactive Serving
- Build-Your-Own Stations: Set up a station where guests can decorate their own cookies with various icing colors and toppings.
- Cookie Tasting Flight: Offer different versions of witch hat cookies, such as mini or filled varieties, for tasting.
How to Perfect Halloween Witch Hat Cookies
To ensure your Halloween Witch Hat Cookies turn out perfectly, keep these tips in mind.
- bold Use quality ingredients: Choosing high-quality cake mixes and icings will enhance the overall flavor.
- bold Ensure cones are cool: Let the sugar cones cool completely before decorating to prevent melting the icing.
- bold Experiment with colors: Don’t hesitate to mix different food coloring shades to create unique designs for your witch hats.
- bold Pipe with care: Use consistent pressure while piping icing to maintain neatness and evenness in decoration.
- bold Allow drying time: Be patient and let each layer of icing dry completely before adding more decorations.
Best Side Dishes for Halloween Witch Hat Cookies
Pairing side dishes with your Halloween Witch Hat Cookies can elevate your festive spread. Here are some tasty options:
- Bold Pumpkin Soup: Creamy and spiced, this soup is perfect for warming up on a chilly Halloween night.
- Bold Roasted Vegetables: A mix of colorful roasted veggies adds a healthy touch alongside sweet treats.
- Bold Cheese Platter: Include a variety of cheeses that pair well with sweet flavors and add savory balance.
- Bold Deviled Eggs: Decorate deviled eggs with green food coloring for a spooky twist that contrasts nicely with sweets.
- Bold Mini Sandwiches: Create bite-sized sandwiches using themed cookie cutters for fun shapes that kids will love.
- Bold Fruit Skewers: Colorful fruit skewers make a refreshing palate cleanser between bites of sweet cookies.
Common Mistakes to Avoid
When making Halloween Witch Hat Cookies, it’s easy to run into a few common pitfalls. Avoid these mistakes for the best results.
- Ignoring ingredient quality: Using low-quality cake mix or cookies can affect the taste. Always opt for fresh and flavorful ingredients.
- Overbaking the cones: Keep an eye on the baking time. Overbaked cones can become dry. Follow the recipe closely to avoid this.
- Improper icing consistency: If your icing is too runny, it won’t hold its shape. Adjust with powdered sugar or water until you achieve the right texture.
- Skipping cooling time: Allowing the cones and cookies to cool completely is crucial. Warm items will cause the icing to melt and run off.
- Neglecting decoration details: Take your time with decorating. Rushing can lead to messy hats that don’t look as appealing.
Storage & Reheating Instructions
Refrigerator Storage
- Store leftover cookies in an airtight container.
- They will stay fresh for up to 5 days in the refrigerator.
Freezing Halloween Witch Hat Cookies
- Wrap each cookie individually in plastic wrap before placing them in a freezer-safe bag.
- They can be frozen for up to 2 months.
Reheating Halloween Witch Hat Cookies
- Oven: Preheat to 350°F (175°C), place cookies on a baking sheet, and heat for about 5-7 minutes.
- Microwave: Heat one cookie at a time for about 10-15 seconds until warm.
- Stovetop: Place a cookie on a skillet over low heat for a few minutes, watching carefully not to burn.
Frequently Asked Questions
Here are some common questions regarding Halloween Witch Hat Cookies.
How do I make Halloween Witch Hat Cookies from scratch?
You can use homemade chocolate cookies instead of store-bought ones. Follow your favorite chocolate cookie recipe and shape them as needed.
Can I customize my Halloween Witch Hat Cookies?
Absolutely! You can change icing colors or even add sprinkles and edible glitter for more festive flair.
How long does it take to make Halloween Witch Hat Cookies?
The total time is around 1 hour and 45 minutes, including preparation and baking time.
What types of icing can I use for decoration?
You can use buttercream, royal icing, or any store-bought decorator icing that suits your preference.
Final Thoughts
These Halloween Witch Hat Cookies are not only fun but also versatile, allowing you to get creative with colors and decorations. Perfect for parties or family gatherings, they are sure to delight everyone. Don’t hesitate to try customizing them according to your taste!

Halloween Witch Hat Cookies
- Total Time: 45 minutes
- Yield: Approximately 12 cookies
Description
Get ready to enchant your guests this Halloween with our delightful Halloween Witch Hat Cookies! These whimsical treats feature chocolate cookies topped with cake cones, creating a fun and festive design that’s perfect for parties or family gatherings. With their vibrant colors and easy-to-follow decorating steps, these cookies offer a fantastic opportunity for kids to get involved in the kitchen.
Ingredients
- Cake mix (or homemade chocolate cake)
- Sugar cones
- Chocolate cookies (store-bought or homemade)
- Creamy white decorator icing
- Yellow food coloring
- Orange food coloring
- Violet food coloring
- Black food coloring spray
Instructions
- Prepare the cake batter according to package instructions and fill sugar cones with 2 tablespoons of batter.
- Place the cones on a baking rack and bake until done. Allow them to cool completely.
- Spray cooled cones with black color mist and let them dry.
- Tint the icing various colors as desired and prepare decorating bags.
- Assemble by piping icing onto cookies and attaching the decorated cones on top.
- Prep Time: 30 minutes
- Cook Time: 15 minutes
- Category: Dessert
- Method: Baking
- Cuisine: American
Nutrition
- Serving Size: 1 cookie (45g)
- Calories: 160
- Sugar: 14g
- Sodium: 70mg
- Fat: 7g
- Saturated Fat: 3g
- Unsaturated Fat: 4g
- Trans Fat: 0g
- Carbohydrates: 23g
- Fiber: 1g
- Protein: 2g
- Cholesterol: 15mg